Style ARC Blaire Dress

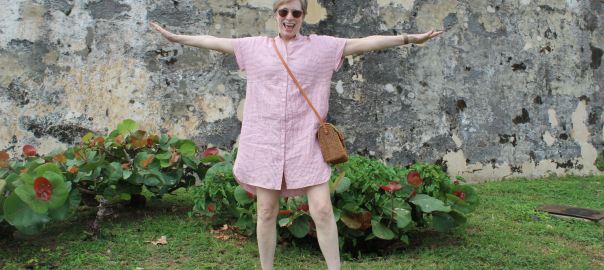
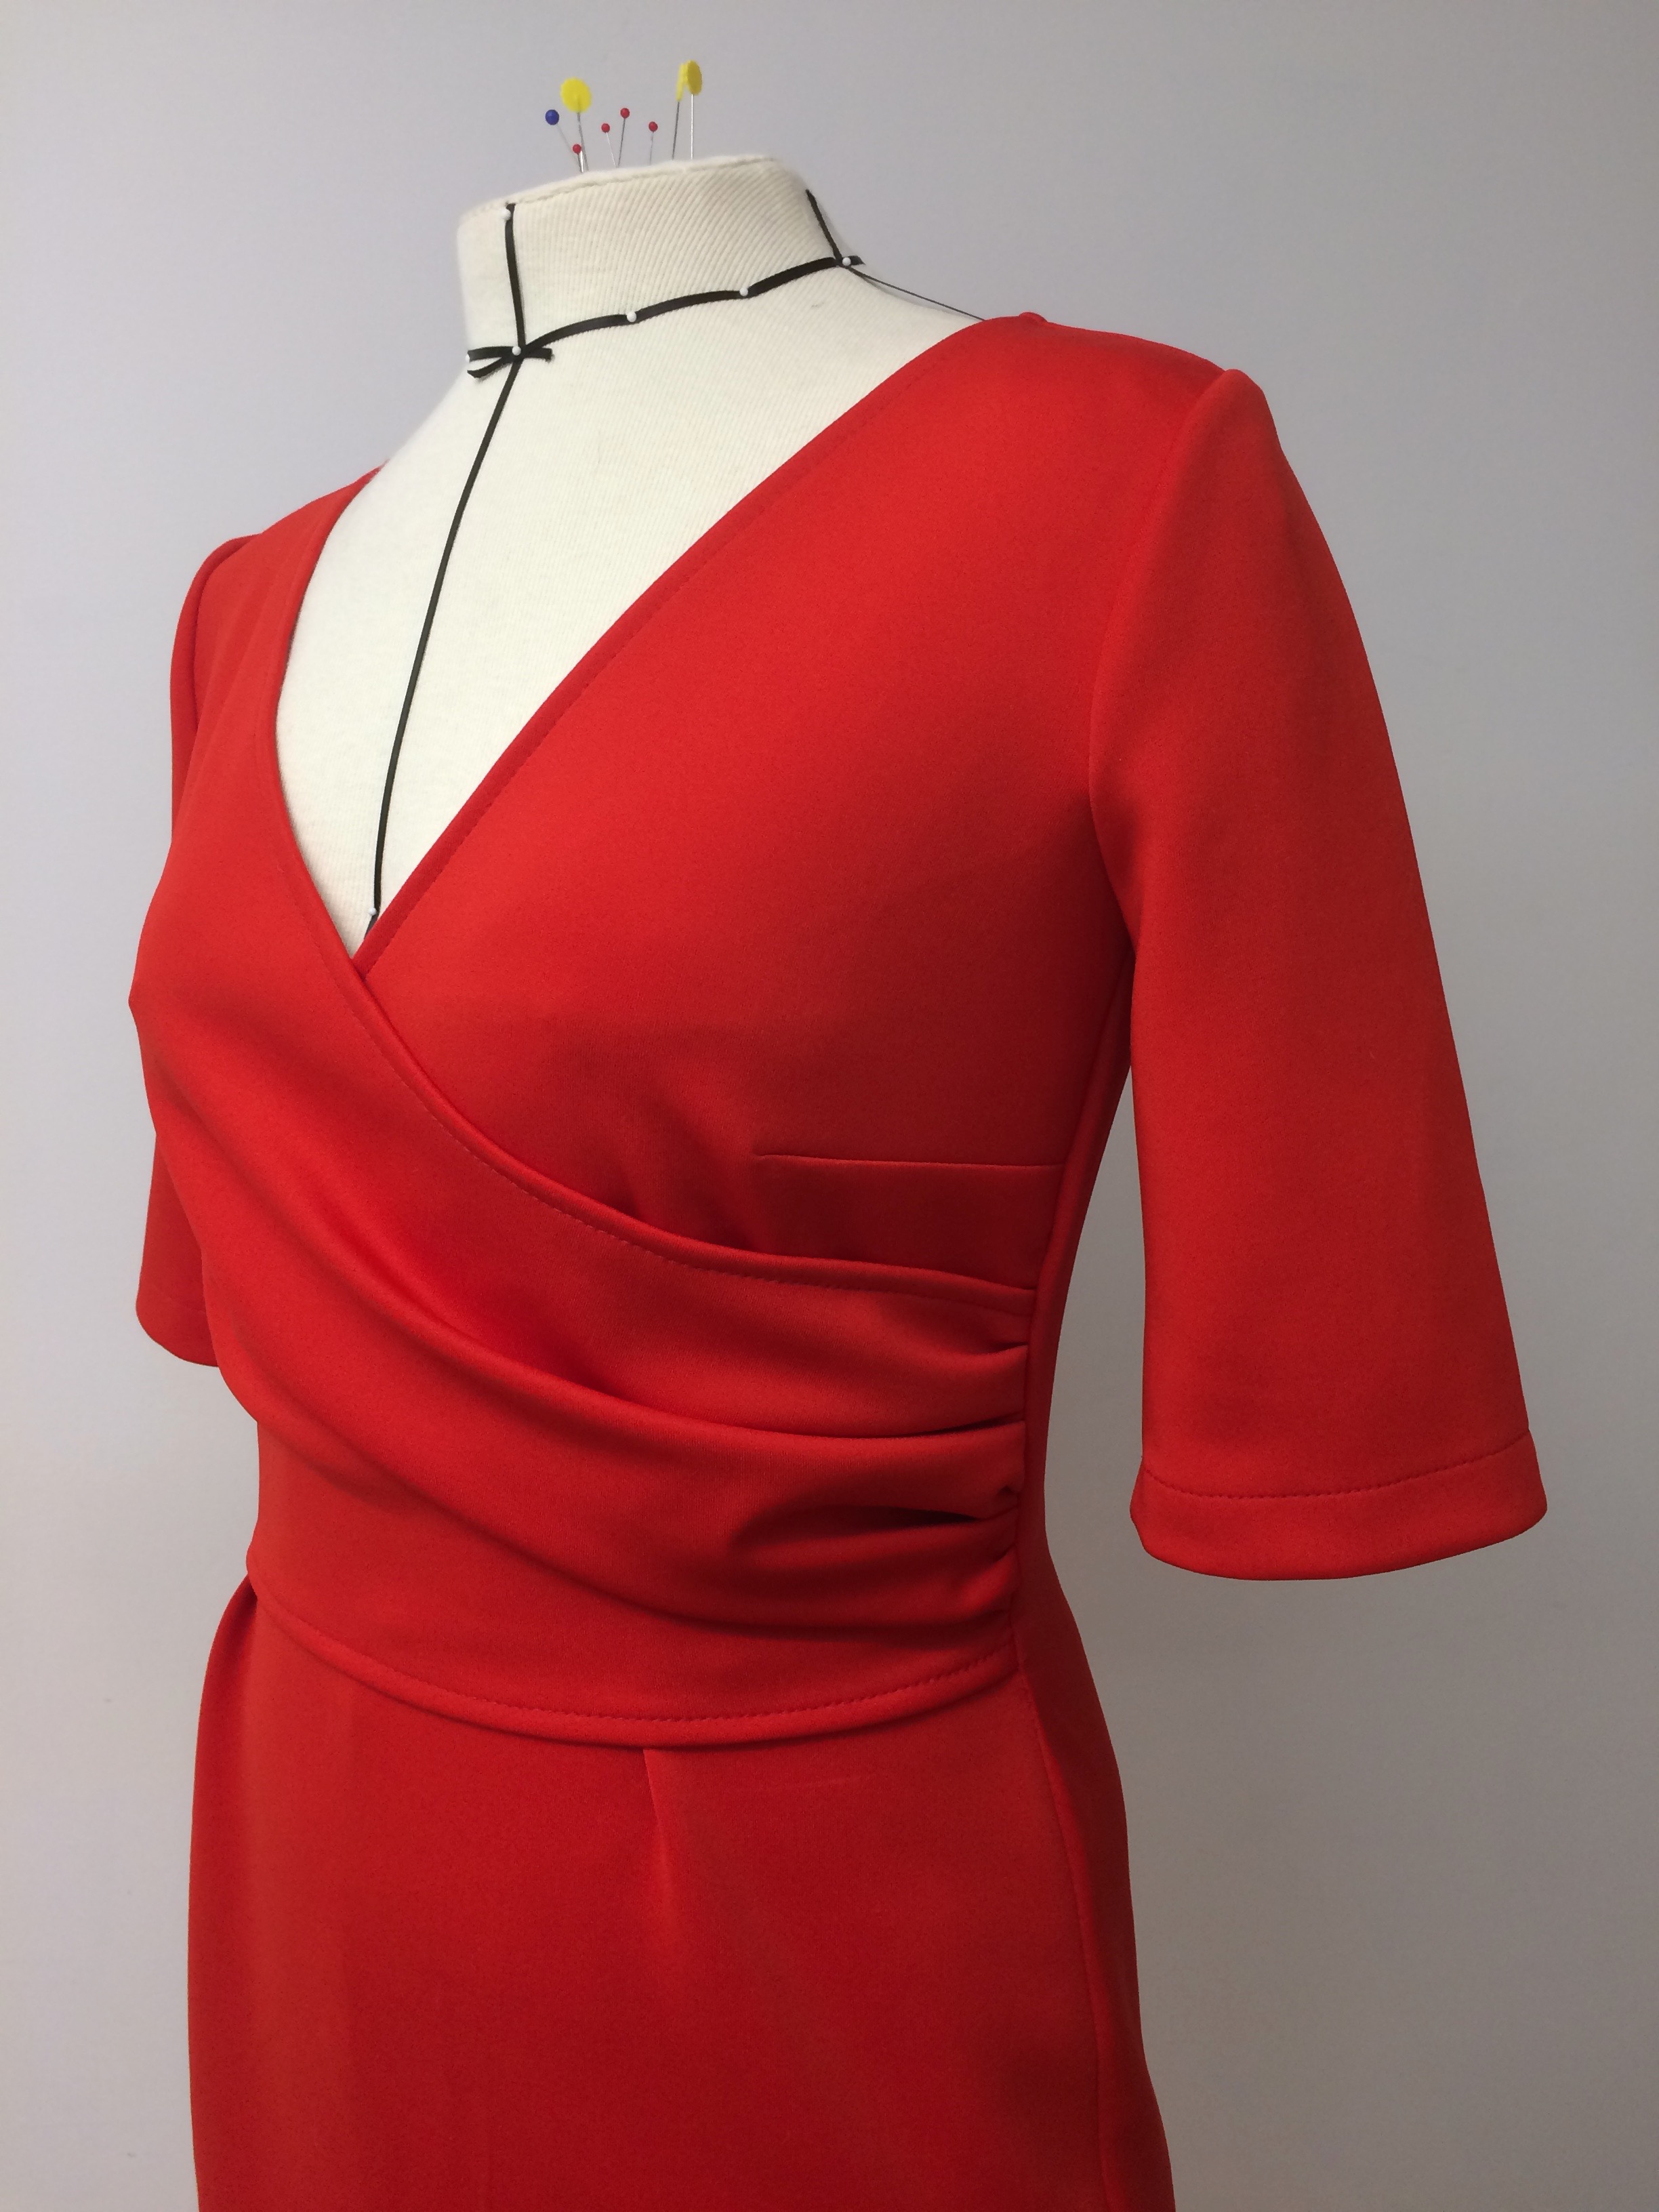
This is my first try at a Style ARC pattern and in the end, I’d say it was a success. This dress was another item that I made for my vacation to Puerto Rico this spring just as the pandemic was starting. I am trying to resist the urge to buy more Style ARC patterns. They are so cute but for most things I can just modify or pull a pattern that I already have. Looking at you Ziggi jacket!

I’m not a big dress person but they have their place. This makes three now hanging in my closet! I find them difficult to style in the winter because I always need to wear a sweater or jacket over them. In the summer they are too cold for air-conditioning (freezing legs) and too ‘dressy’ for home use – so that leaves me with tropical vacation wear for which the Blaire was perfect. (I’m showing my age but I distinctly remember wearing pantyhose in the hot Atlanta summer back in the mid-80’s. Ick.)

Pattern

The dress view has a very loose fit, cut-on short sleeves with a turned back cuff, two-piece shirt collar, button down placket, and a shirt-tail hem. The pocket bags are loose and hang down below the hem at the side which makes for some interesting design opportunities like color blocking.

[Second runner up was the Kalle dress from Closet Core. The two designs are very similar but I went for the Blaire because of the interesting pocket detail and the horizontal seam below the bust.]

This pattern also includes a top which looks like a lot of fun with the right fabric.

Construction

I actually followed the instructions(!), which by the way are written in a teeny tiny font with no spaces between the steps. Style ARC’s graphics and diagrams are lovely, but they dropped the ball when it comes to the text which is crammed into a half a page. Aside from that my only complaint is the technique used to install the collar. I think that there are better ways to do this that give one a neater finish.

Fit

I cut a size 10 according to my bust size but should have gone one size down because I was swimming in it.  This was a fairly crisp fabric so may have worked better with something that had more drape.  I tried it on once the pockets and cuffs were in but before the collar and front placket were installed and determined that I needed to take 4” out of the circumference at the bust.  I took 2” out of the back by creating a center back seam in the bodice.  I didn’t need to take anything out of the lower back so unpicked part of the horizontal seam and eased the skirt in by 2”.  I took 2” off the center front edge and then recut the neckline to its original size before adding the collar.    Good save Meg!  Not sure a muslin would have helped me with this one since the muslin fabric has such a different hand than the linen.

Aside from fitting, I made a couple of design changes. I eliminated the collar and increased the height of the collar stand by roughly 1”. I also shortened the length by 3 ½”. The original was just below the knee which feels frumpy on me so I raised it to the top of the knee.

Fabric 

This is a washed yarn-dyed linen in a small stripe, and I have no idea where I bought it.  I know it wasn’t Emma One Sock, so possibly a sewing guild yard sale?  If so, I would have paid $3 for it!  I had fun with the stripe orientation in order to show off some of the pattern details.  It’s important to note here that the stripe is railroaded.  In this case the stripes on the lower portion of the dress run up and down which means it’s on the cross-grain and so isn’t draping as much as it would if it was on the lengthwise grain.  I knew this going in.

Lessons Learned

Need to remember to use the “Bishop Method” when installing shirt collars. Same as _____________. David Page Coffin also has some nice techniques for collars and cuffs using a glue stick of all things.

Beach Kimono – McCall’s 4304

Between the Puerto Rican earthquakes and the worldwide pandemic my sister and I were lucky to squeeze in a wonderfull week in Puerto Rico right at the end of February so I made a few pieces to take along.

I had my colors “done” last summer by Nany Nix-Rice (!) and I know now that I need to tone down the bright colors I’ve been trying to wear.  As my hair greys, there is less contrast between my skin and hair so my facial features can too easily take a back seat to clothing that’s too dark, too light, or too bright.  Darn! And I was so happy with my colorful stash!  I  tossed a few items, but intend to continue to sew through the rest.  I’ll just need to be careful about my purchases going forward.

Fabric

This brings me to this beach coverup that I made for the trip.  It’s a light-weight cotton by Milly in a kaleidoscope of colors that’s just a little bit sheer.  I usually wear an oversized linen shirt over my bathing suit but thought this bright fabric would be a great way to get my color on at the beach where no one cares that I’m too bright!

Pattern

I had my eye on the kimono trend (Am I too late?  Is it already over?) so grabbed this pattern, McCall’s 4304 at an ASG event last year for 50 cents.  (Copyright 2003).  I made view B, the longer length with sleeves.  It’s been AGES since I sewed a big 4 pattern!  It’s a loose-fitting garment so I went rogue and didn’t make a muslin.   Luckily the fit came out just fine.

Since it was so light-weight I added a lining to the body in a solid cotton voile in a muted blue which helps with sun protection.  Because of the lining I only paid loose attention to the directions.

I’ll make this pattern again if I come up with the right fabric – maybe think about it as streetwear instead of beachwear.

Lessons Learned

Think through and test the hems before cutting if possible. The directions call for a narrow hem at the sleeve but with this partiular fabric I think a wider hem would have draped better.

Should have tested the length of the waist ties which are too short by about 18″. I may go back and make them longer…

Peek-a-Boo Patterns Bahama Mama Peplum Tankini

Woohoo!  I made a bathing suit y’all!  I made a few pieces for a vacation I took to Puerto Rico in February including a dress, beach coverup, two swim briefs, swim shorts, this tankini top, and a rash guard so there’s more to post.

I’ve been warming up to the idea of sewing swimwear for a few years as my RTW suits started sagging and stretching out due their age.  I wanted a Tankini and never could find one that fit well.  I’ve come close on this first project and the next time will be even better.  I may even buy more of the same fabric and remake it.

Meg’s bathing suit criteria:

  • No cups
  • No strings
  • Nothing strapless
  • Not frumpy
  • High waisted brief
  • High cut leg ca. 90’s
  • Sun coverage a plus
  • No exposed waist/torso
  • Flattering color in a print
  • No black.  Minimal white.

My biggest problem with most suits is that they are too tight.  They are designed to stay on when you dive or frolic in the surf, and many are supposed to ‘shape and hold’.   I hate anything tight at my torso/waist.  (My mother can tell you that I used to cut the waistband of my tights and/or underwear when I was little.  To this day I still make a series of snips in the waistband of tights and pantyhose.)  In RTW, by the time I get the torso/waist to be comfortable, my IBT’s are swimming in the bust cups, so yeah for sewing! 

Yup! A bit too snug.

Pattern

Enter the Bahama Mama Tankini top by Peek-a-Boo patterns which is a new to me pattern company.  It has a racer back, and a horizontal seam detail across the bust and at the waist where the peplum attaches.  It also has self-fabric binding at the neck and armholes.  The pattern includes a shelf-bra with instructions to add cups.

The peplum could be seen as cute, or old lady-ish.  Not sure it’s going to stay. My husband’s response when I asked about the style, was “It’s appropriate for your age.” I just turned 60 so not what I wanted to hear!

The instructions were clear and helpful, and since this was my first time working with swimwear fabric I actually followed them!  The directions include photos as well.

Fabric

I’ve had my eye on this Koi pond Spoonflower design for ages but never knew what to do with it.   Aha, of course swimwear!  Duh!  If you know me, you know that I will review, sort, and agonize organize all of the possibilities before pulling the trigger, and I ended up purchasing a few more pieces for a few more bathing suits.

For those uninitiated, Spoonflower will print whatever you want on any number of fabrics they offer.  You can select prints from those posted by graphic designers, or upload one of your own. This is printed on solid white Lycra so there is little show-through.

Construction

I cut a size S at the bust, M at the waist, and L at the hip all according to my measurements.  I used my serger for the seams, plus a zigzag stitch at the neckline and armholes.  I also inserted a cute bit of flat piping in the horizontal bust seam.

I had some cheap swimwear fabric that I could have used for a muslin but it was stretchier than the fashion fabric so wouldn’t have been the same.

I removed the band for the shelf-bra and stitched the sideseams down to the fashion fabric so it will stay in place.

Next Time

I’ll likely use this pattern again but will make a few adjustments.

Cute koi and bonus racing stripe.
  • Most importantly if I use the Spoonflower Lycra, I’ll cut it one or two sizes larger at the waist/torso and hip as it’s just too snug for me. See ‘bathing suit criteria’ above.
  • Shorten the back straps by ½” to 1”.
  • Eliminate the waist seam.
  • Construct the binding a bit differently at the neck and armholes to reduce bulk.  (The photo on the pattern takes advantage of the bulk by using an accent color.)
  • I may just remove the peplum and lengthen the bodice.

Lessons Learned Not all Lycra swimwear fabric is the same.  Some is firmer, some thinner and stretcher.  Buy enough to make a muslin out of the actual fashion fabric if you can afford it.

Python Print Jacket


IMG_1635
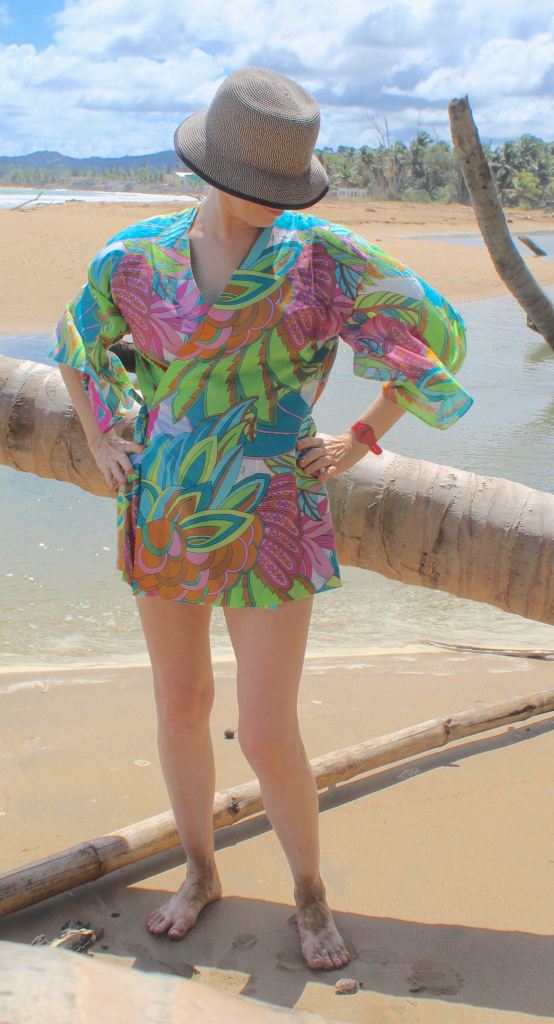
Better late than never for #JungleJanuary!

On my SWAP list was a neutral all-purpose indoor/outdoor casual jacket that I could wear when it’s cool in the summer.  “Cool summer” places include work, car, grocery store, and commuter train so basically everywhere except at home.  I had originally envisioned a natural or cream colored belted jacket in linen similar in style to Collette’s Lady Grey coat, but that morphed into this moto inspired jacket once I saw this snake print.


Fabric  –  Ah yes, the fabric is what this is all about, right?  All thoughts about the all-purpose cream color were set aside when I saw this lightweight cotton twill in cream, black, taupe, and grey.  It’s from Emma One Sock of course, purchased in 2014.  I laid it out as a single layer so I could see all of the print which is not symmetrical.  Luckily it doesn’t have a nap so I could rotate the various left or right pieces 180 degrees so the print would be roughly symmetrical with the darker swaths on the sides.

It’s lined in a dotted grey silk purchased eons ago.  It has a bit of a matte texture so it’s not always easy to slide on, but it’s warm.

Pattern  –  Self-drafted!

This jacket is based on an as yet un-blogged fitted linen jacket with set in sleeves, shawl collar, and peplum drafted using the Armstrong pattern drafting book.  I converted the linen draft to the python version using my newest pattern drafting book, Metric Patternmaking for Jackets and Coats that my honey gave me for Christmas a couple of years ago.  Love!  I only made one muslin to check the raglan draft, design the front opening and collar, and to check the ease through the body.

Features:

  • Raglan sleeves with overarm seam.
  • Faced elbow length cuffs with zips.
  • Front and back princess seams.
  • Moto-inspired diagonal exposed separating zipper. One side of the zip extends up into the shoulder seam.
  • Mandarin collar with contoured front.
  • Applied pocket with zipper and lining.
  • Cuffs and pocket have an ultra-suede detail to cover the ends of the zips.
  • Fully lined.
  • Long enough to cover a big shirt or long sweater.

IMG_1637
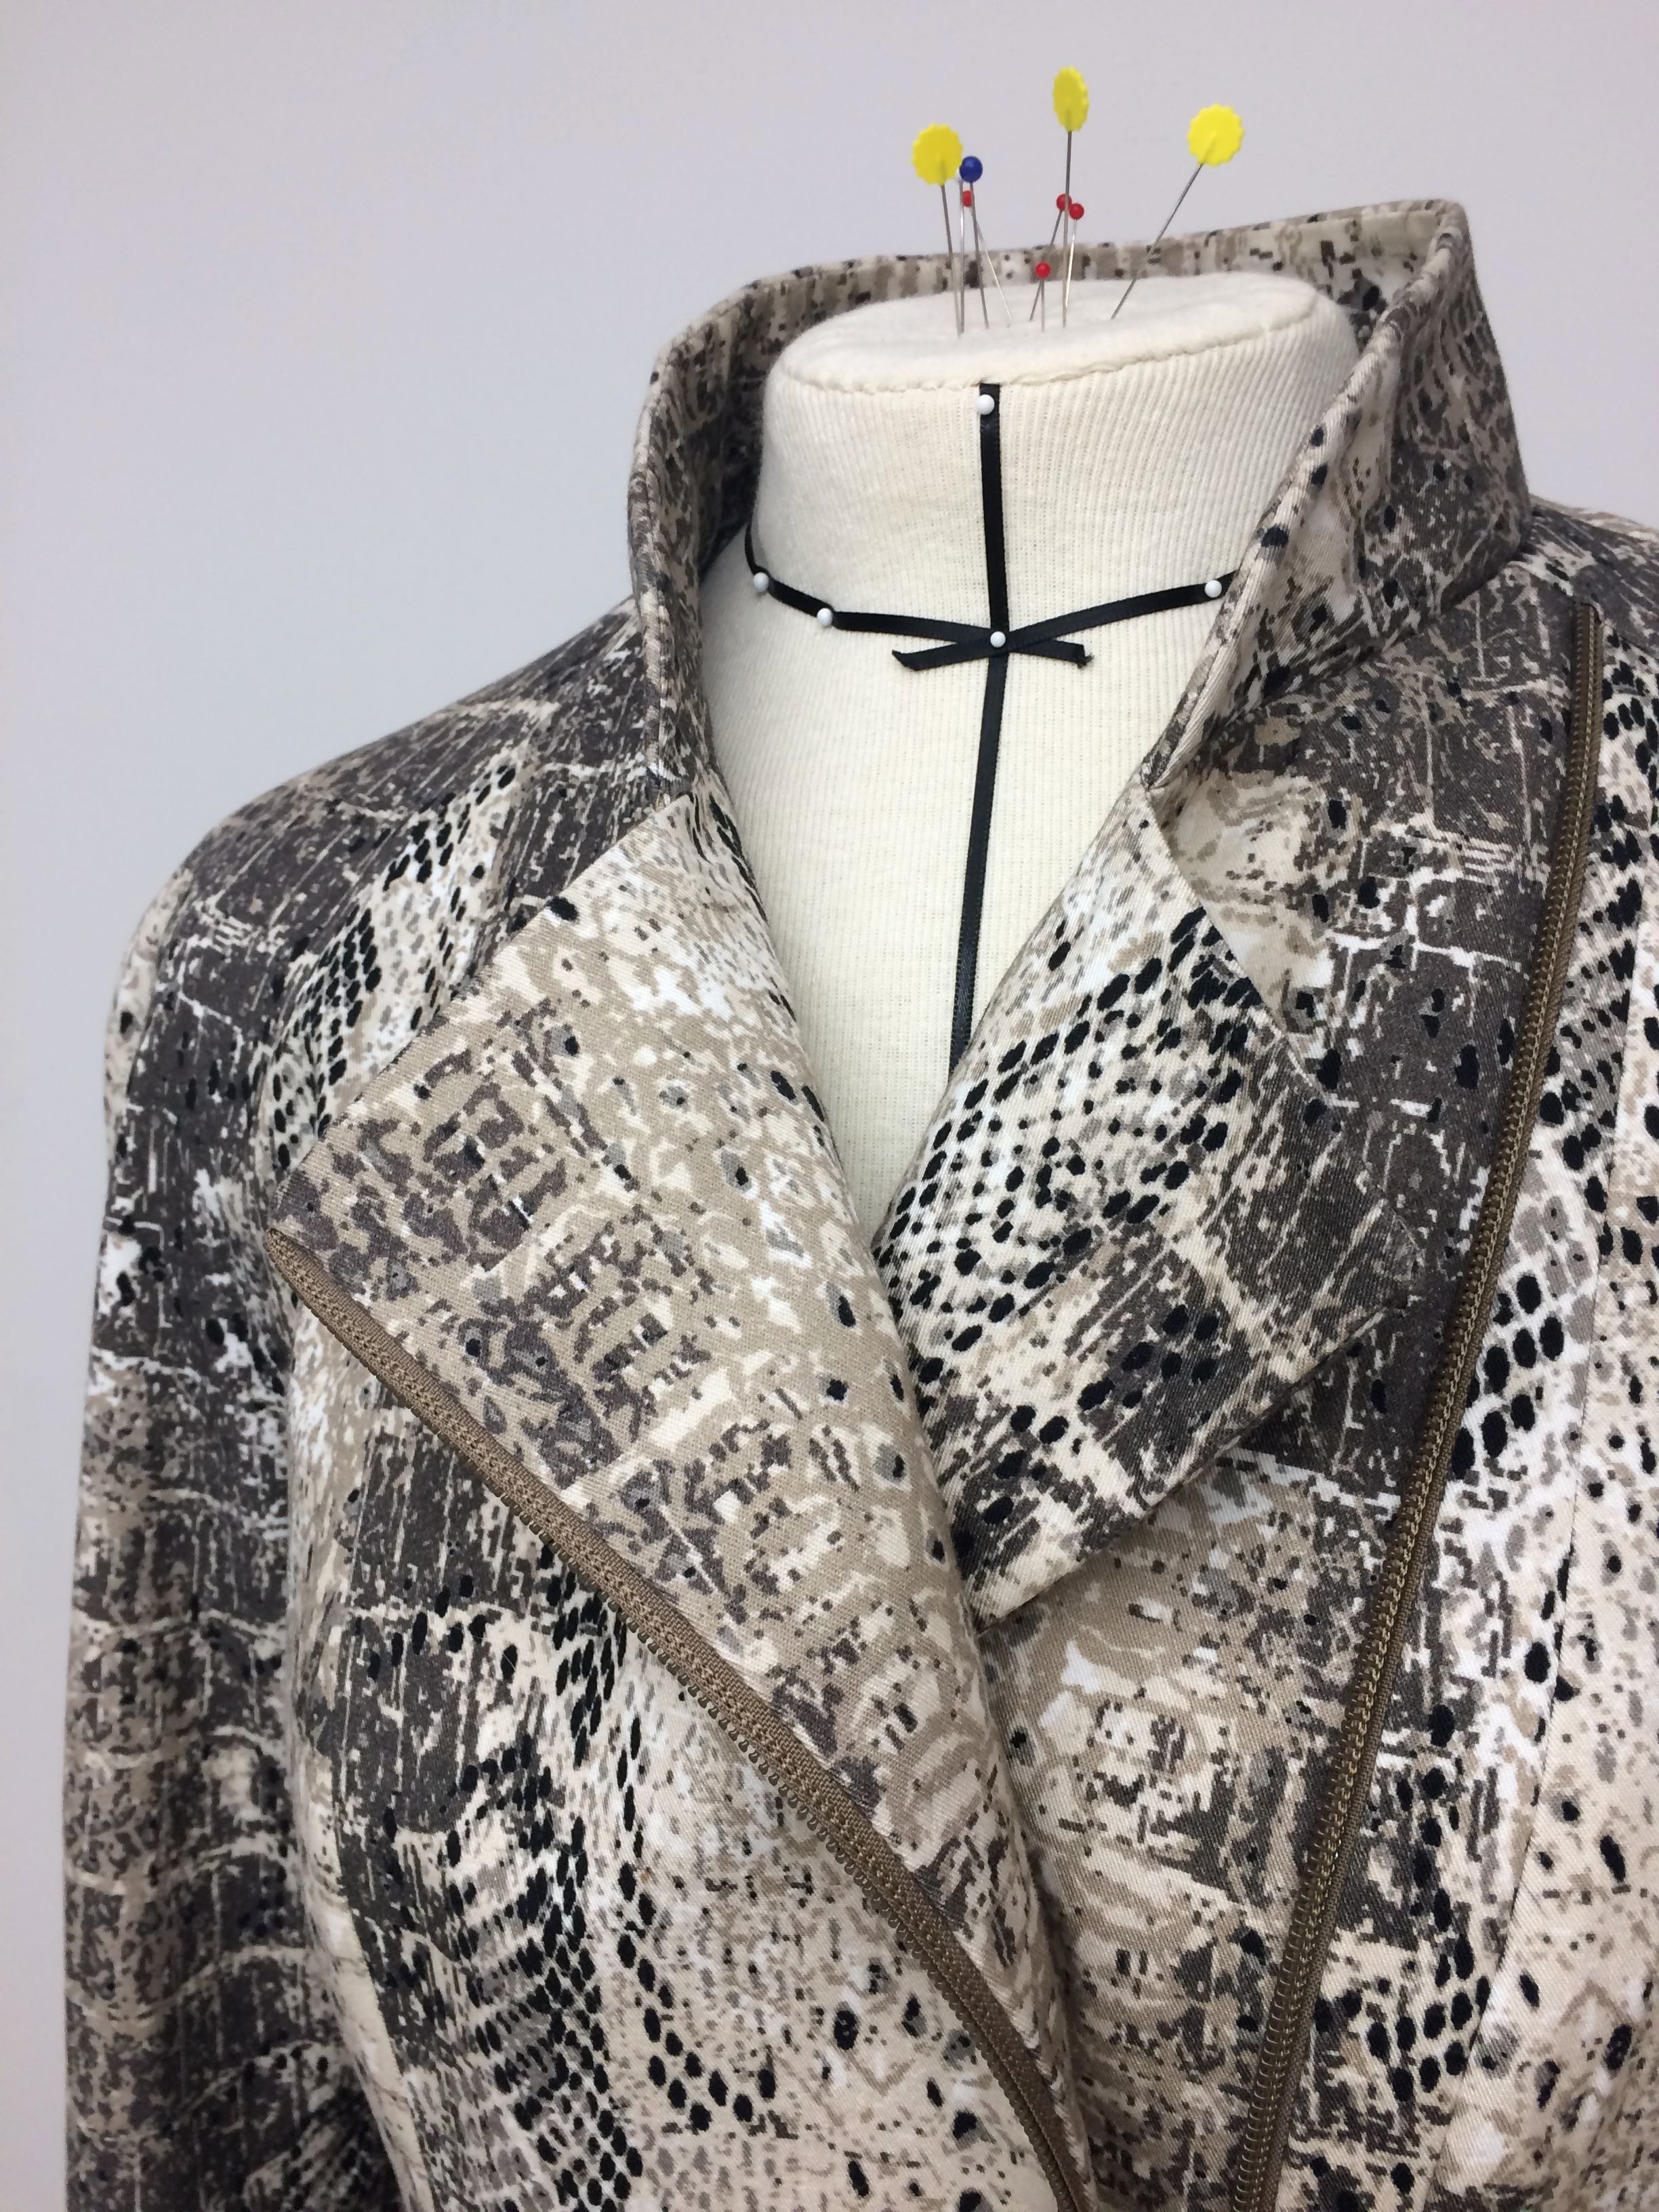
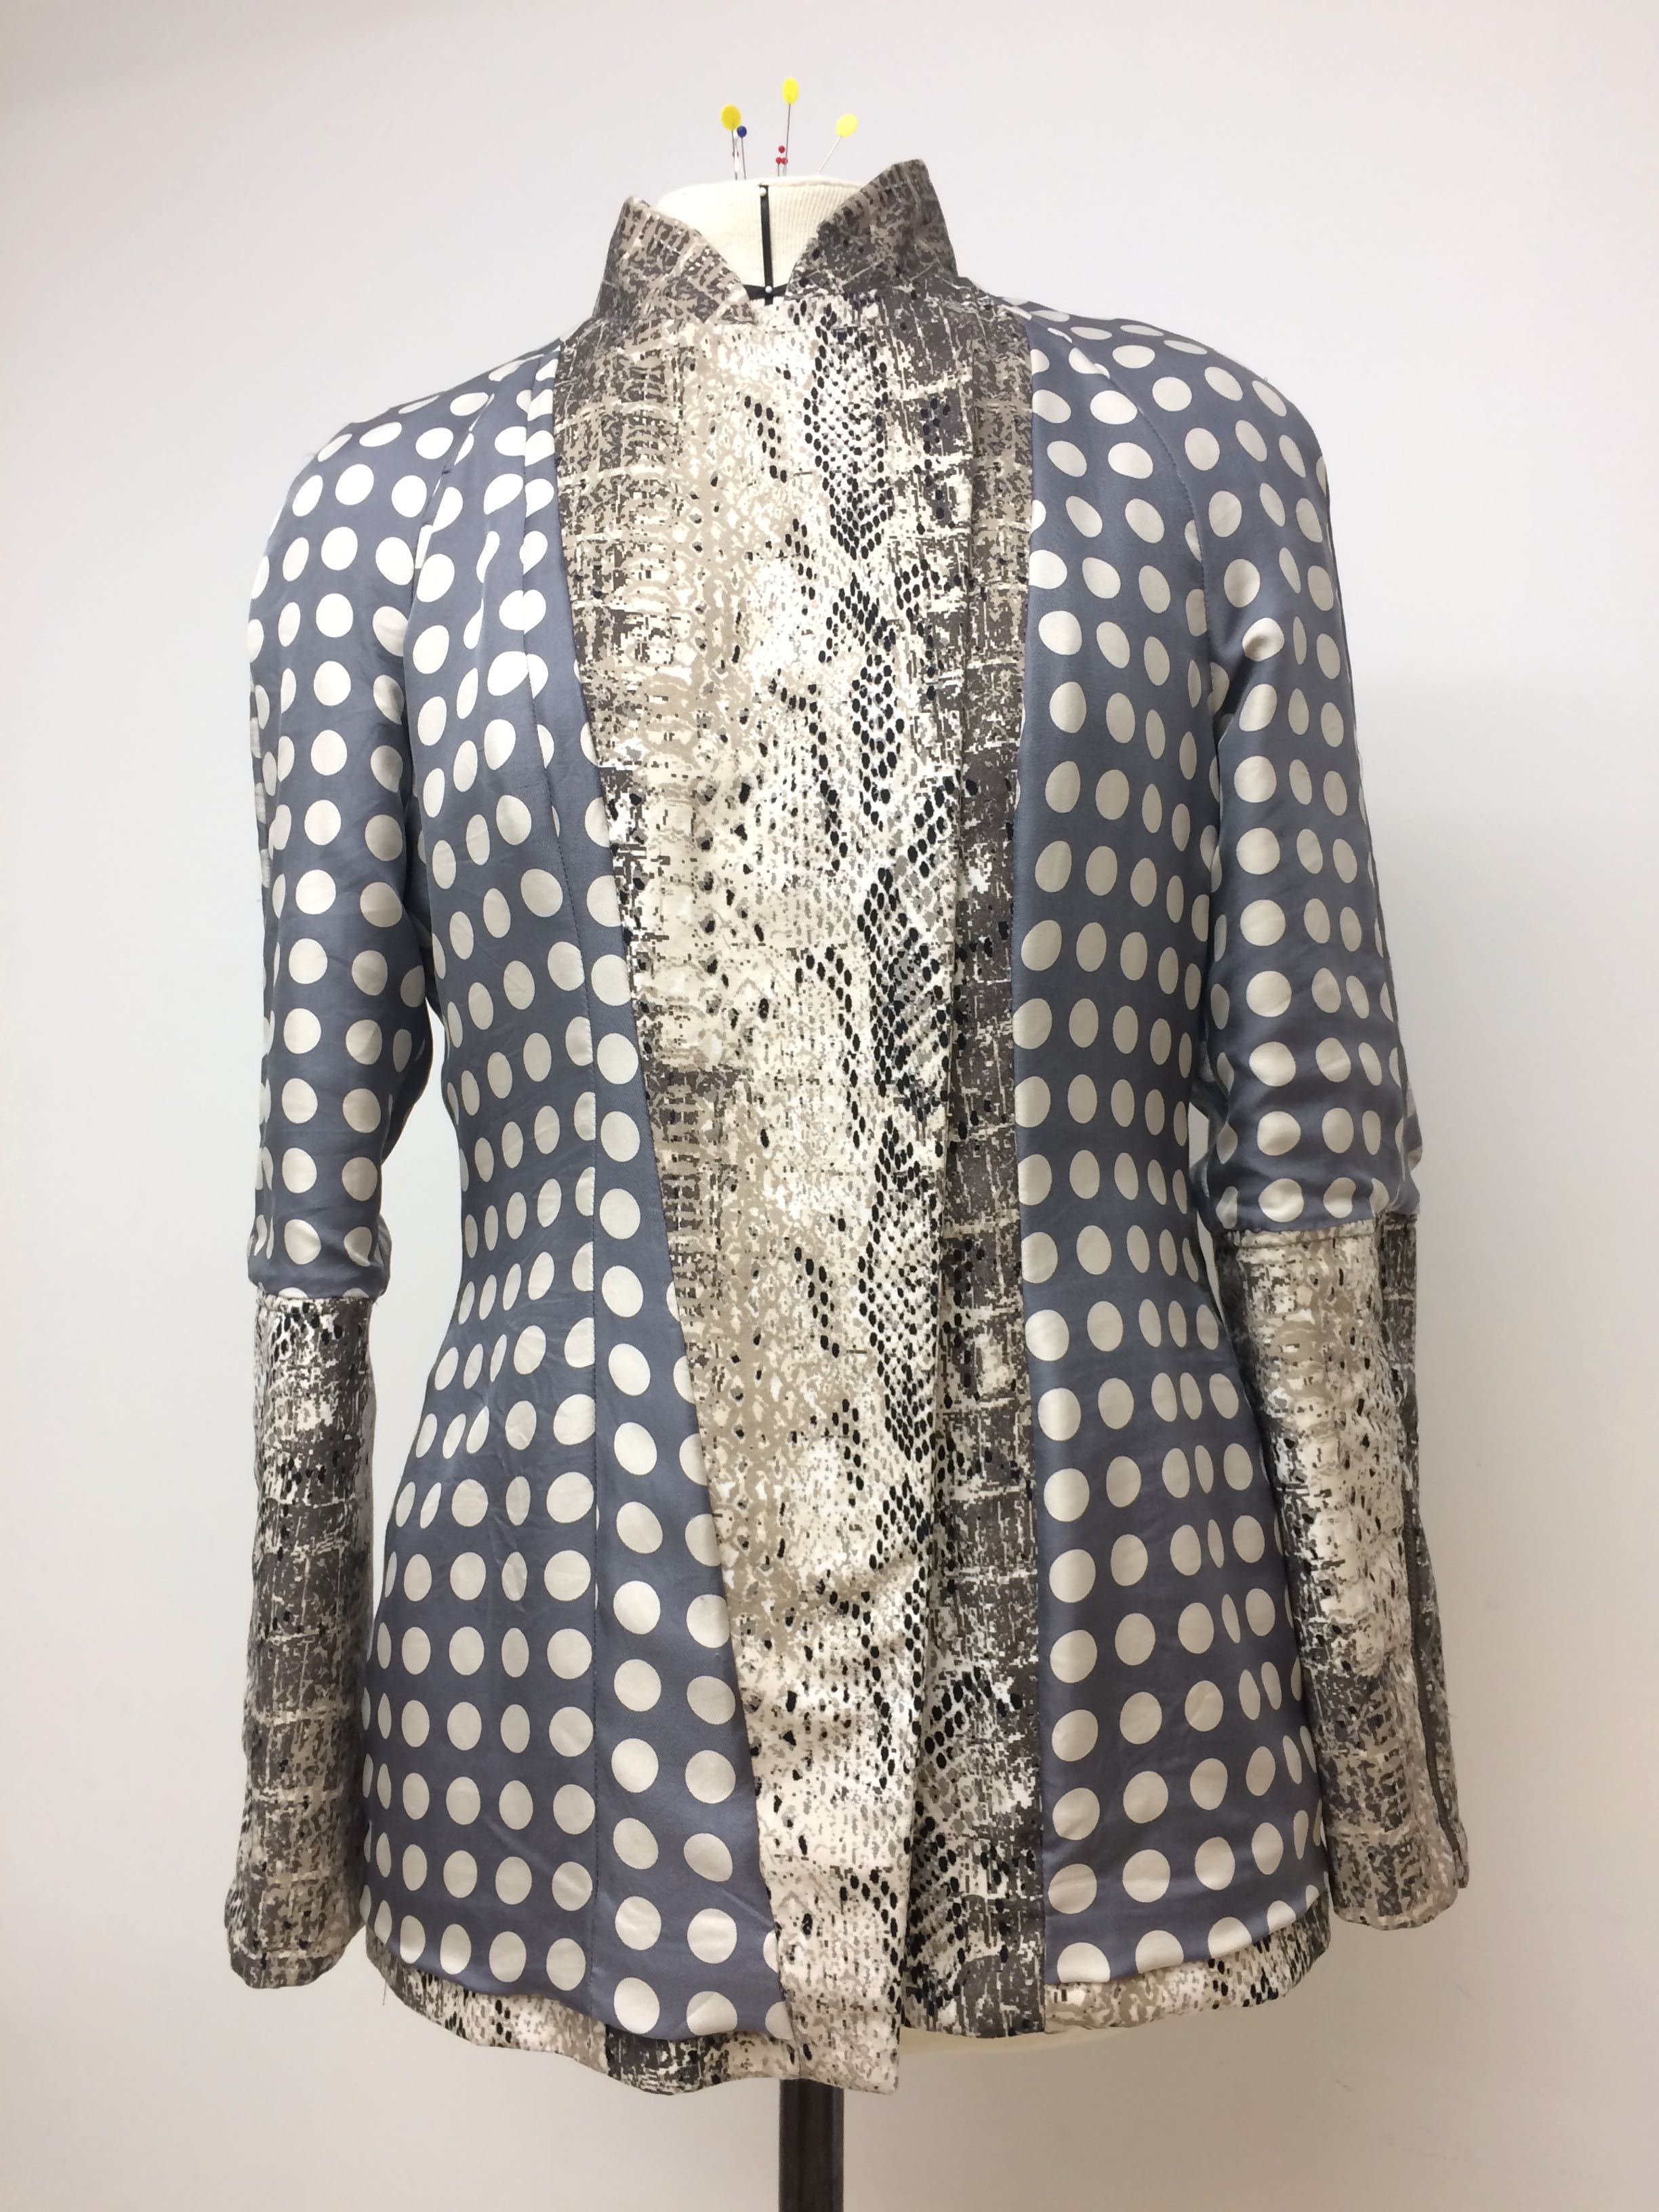
Construction  –  The construction itself was straight-forward; no tailoring, no shoulder pads, no sleeve heads, so relatively easy to make.  Jackets for Real People has recommendations as to what type of interfacing to use where for different types of fabrics, so with a bit of experimentation, I decided on three different types; one type at the front, a different one at the at the front facings, and a third for the collar and cuffs.  Next time I would double the collar interfacing and beef up the front facing as it’s not quite as firm as I would like.
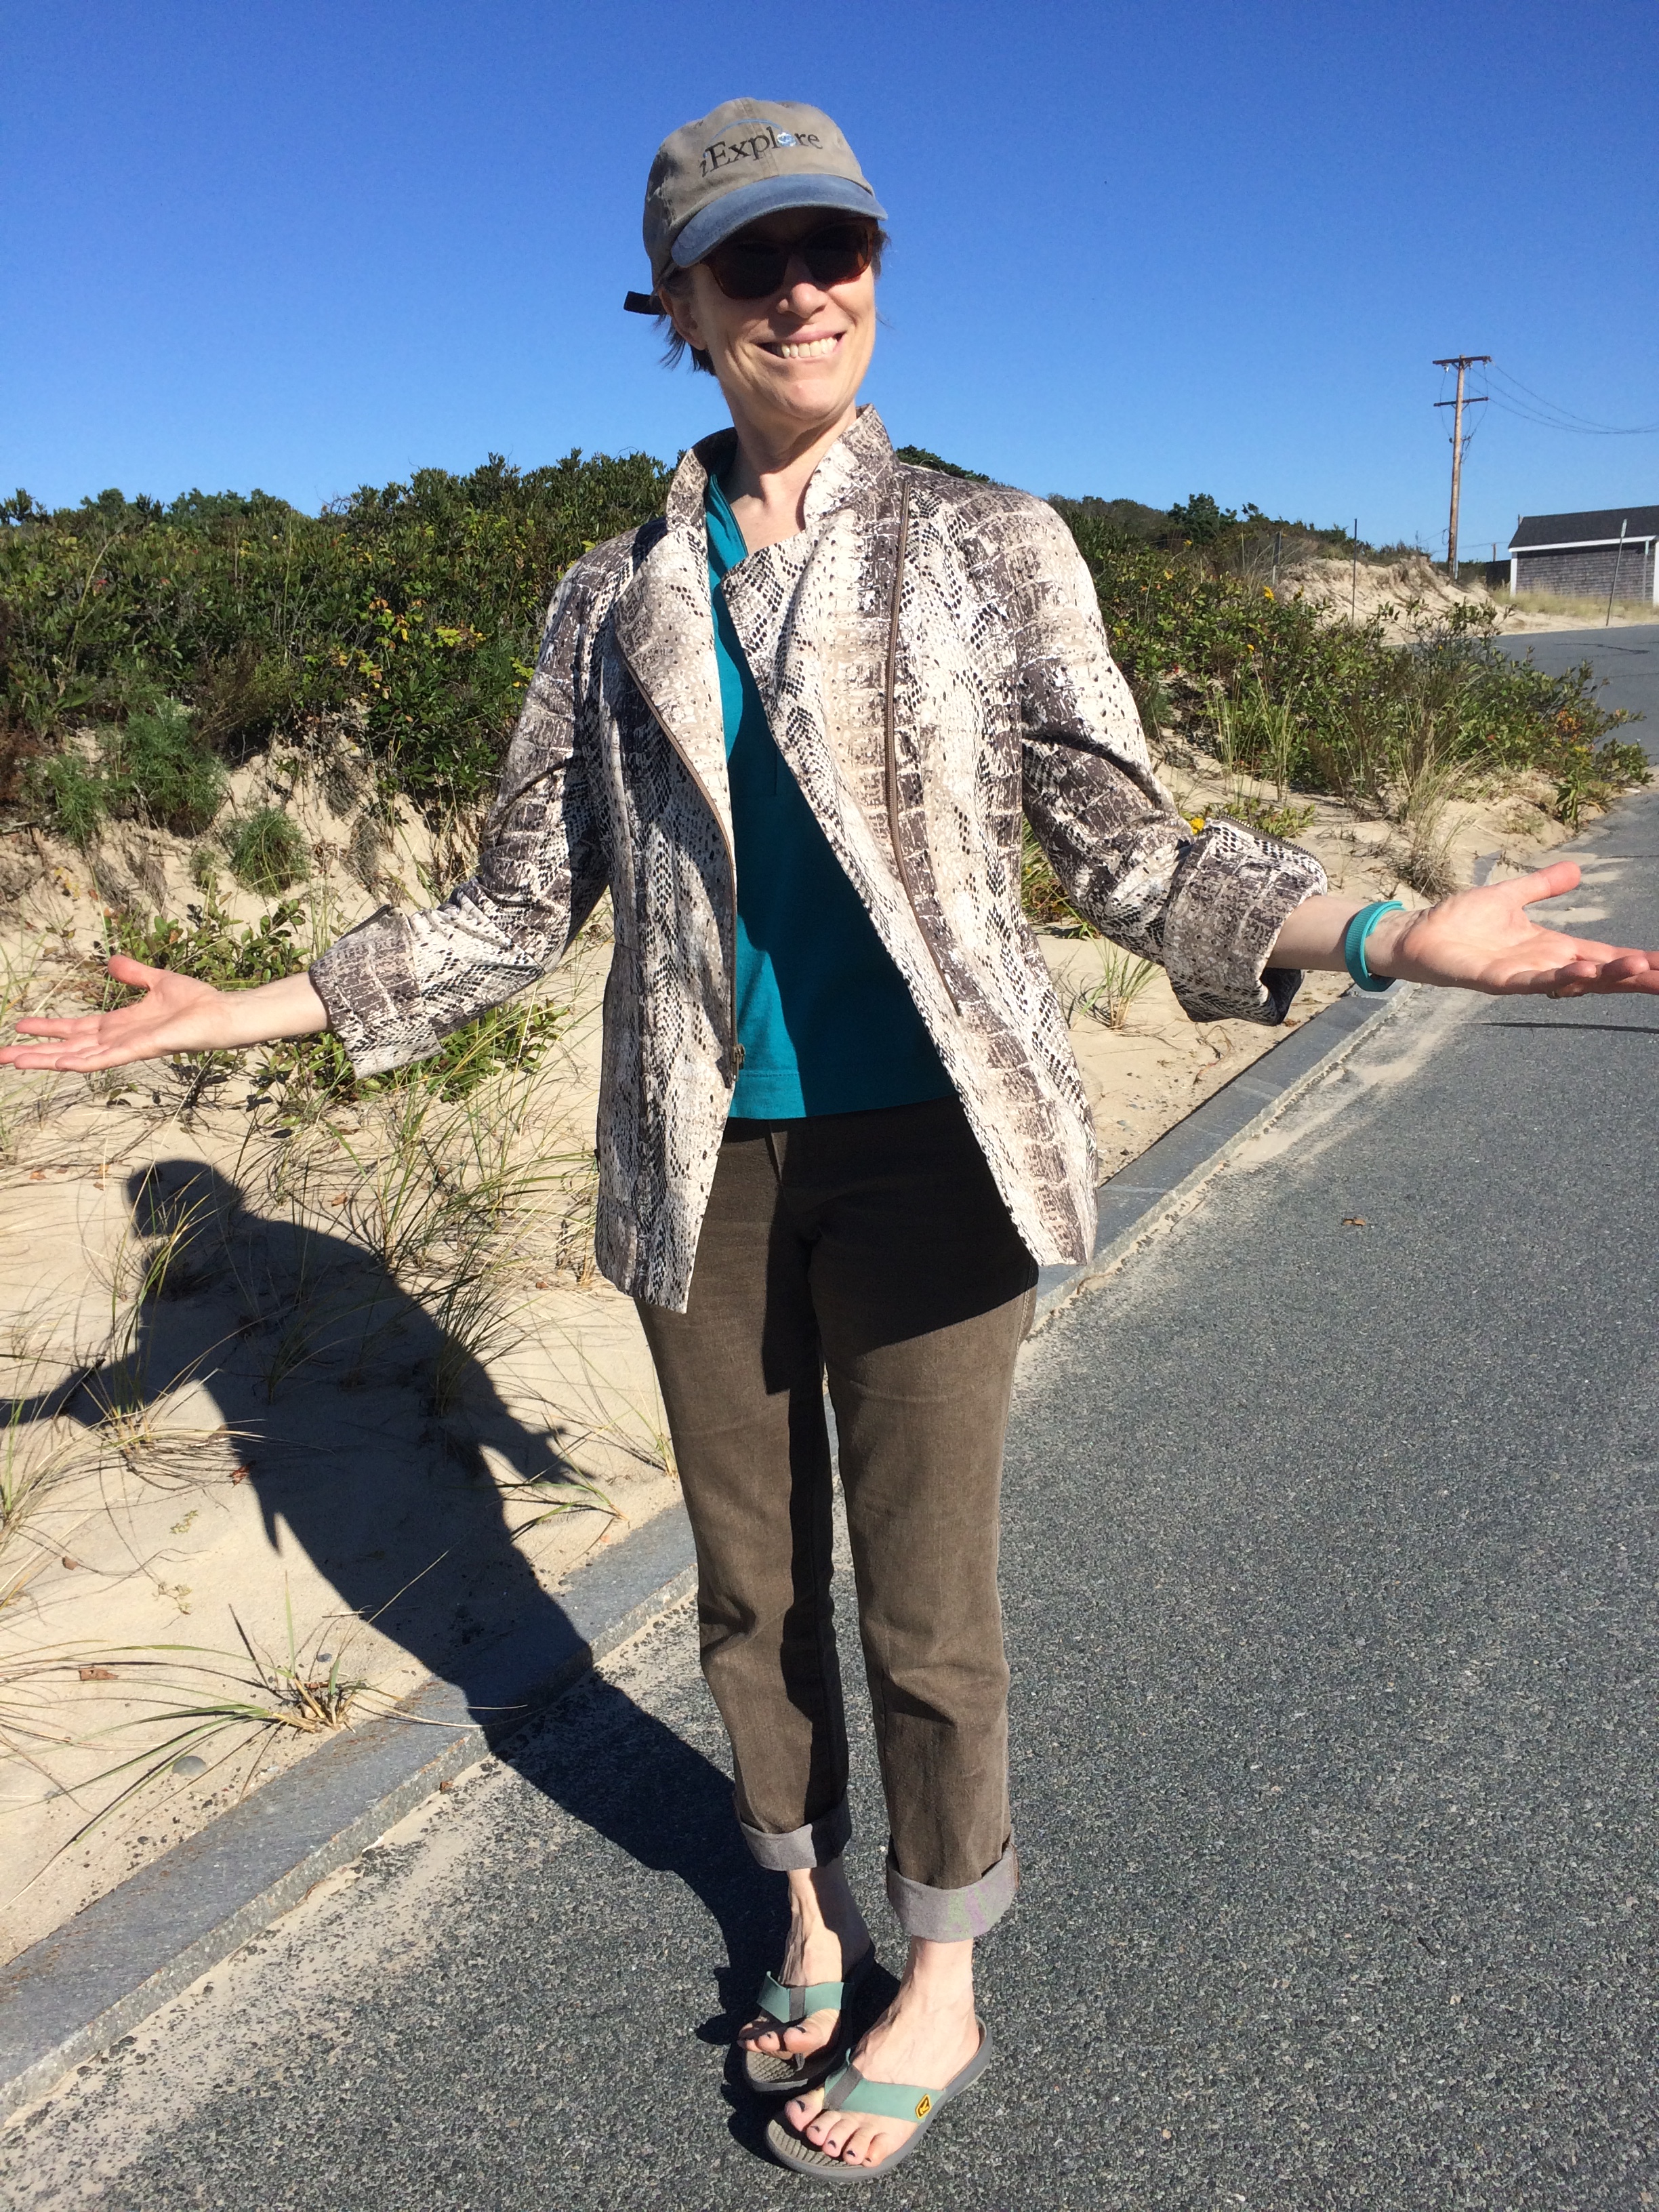
The big news here is that this is my first bagged lining and it looks very sharp!  I followed the technique in Jackets for Real People and I’ll definitely do it this way again.  It has such a professional look!  You get a clean finish where the facing, lining, and hem all meet at the front.

IMG_1696

Fit  –  I drafted this and made the muslin over a long weekend in February.  It then sat on Helena for two months until I got the courage to try it on and work out the fit.  With a few tweaks I decided it was ‘pretty good’ and ran with it. I had a difficult time eliminating some puffiness at the upper back which I unfortunately think comes from my sloper.  At the same time, it’s tight across the back when I reach forward so I can’t remove the puffiness.  I need to figure this one out as it’s happened before.

Also it could use another inch or two of ease at the waist and hips.  I did want it fitted but not quite so fitted!

Update: Yep, I can correct some of the puffiness by adding more ease at the back at the waist and hip so it falls better.

Lessons Learned

  • First bagged lining.
  • First raglan sleeve draft. Woohoo!
  • First time removing coiling zipper teeth. Duh, it really is a coil!
  • There are so many more zippers out in the world than what we see at Joann’s. I ordered a variety of jacket zippers from Wawak.  The colors and sizes were trial and error, but I learned about zipper sizing so next time I’ll have a better feel for what to order.  The front zip is a size #5.

Burda 7525 – A Chambray Shirt for my Honey

img_0655

For Christmas last year my Honey asked for a replacement for a much loved chambray shirt that had seen better days.  I couldn’t find anything similar online in the right shade of blue so I offered to make one.  Besides a few pajama bottoms and a fleece, I’ve never made him any clothing.  I know, selfish, selfish….

During our recent vacation at the lake in NH when I get to do nothing but sew and swim I took my time and made the shirt.  I take over the entire dining area for sewing when we’re there and have a beautiful view of the water.  Hah! This year I brought a pile of alterations and mending, and the makings for a jacket and pants for me, and Honey’s shirt.  Don’t want to run out of things to sew!  I kid.  As the world’s slowest sewist I know I can’t make all those things but it gives me choices.  I finished Honey’s shirt, including muslins, roughly over the first week.  I promised myself I wouldn’t start anything else new until I got through the alterations.  I made the easy changes like sewing on buttons but stalled out when it came time to taking in a few pants.  I can be such a procrastinator.  Ugh!  I hate having to try stuff on again and again when I’m sewing.

PATTERN

After a quick search for a men’s-long-sleeved-popover-casual-band-collared shirt, I decided on Burda 7525.  I haven’t made a pattern from tissue paper in ages!  The last few years I’ve either drafted them myself or downloaded Burdastyle PDF’s but  I really didn’t want to draft this for my first go.  This pattern has a relaxed fit, band or two-piece collar, bib front option, back pleat, and cuffs.  I’m giving it a thumbs up.

img_0653FIT

I am quite pleased with the fit!  I wasn’t sure what to expect at first.  I had hoped that fitting the male body might be easier than fitting a woman, but since my Honey is “mature” I knew I’d have to make a few adjustments.  Some of the modifications are the same ones I’d make on a garment for myself.

I made the following design and fitting changes:

  • Added a back yoke to allow for a rounded back.
  • Moved shoulder seams forward and shifted the sleeve cap to match.
  • Narrowed Shoulder width and raised cap height to accordingly.
  • Shortened sleeves ALOT.
  • Changed inverted center back pleat to knife pleats at the shoulder blades. The take-up of the fabric  across the back is the same, but it’s distributed closer to the arms.  I’m going with the theory that this makes the shirt more comfortable when you pull your arms forward.  Curious if anyone has experimented with this.
  • Made an “FSA”. (Full Stomach Adjustment!) I was trying to figure out how to add more length to the front just under the bib so the front would hang straight down and not stick out, not unlike an FBA.  I found a little nugget in David Page Coffin’s Shirtmaking book that referred to a full chest modification with a bib front.  I basically created horizontal darts at the chest by opening a horizontal swath along the bottom of the bib. The darts are then then rotated up into the vertical seam between the shirt front and the side of the bib.  Yah, there were some mental gymnastics required for this one.

Since this was my first men’s shirt I ended up making two muslins which may seem like a lot but I want to be able to use this as the starting point for other types of shirts.  Next time I’ll add a bit more ease across the back, and I’ll make it a few inches shorter.

FABRIC

This is a 100% cotton chambray I found at NY Elegant Fabrics in NYC.  (I was there a few months ago for the Patternreview Weekend 2017 which was a ball!)  According to the dictionary, Chambray is a type of plain weave cloth of a cotton, silk or linen with a colored warp and a white weft.  I knew this but I always associate chambray with a particular shade of indigo.

img_0649

TECHNIQUES

I ignored the Burda instructions and followed most of the techniques and varying seam allowances prescribed in Shirtmaking by David Page Coffin. The seams are all felled including the sleeve/armhole seam.  Coffin’s instructions are very clear.  I also used his directions for the collar and cuffs.  He uses a washable glue stick to ‘baste’ the inside faces of the cuffs and collar stand/band down before top stitching.  The Lakehouse was fresh out of gluesticks so I pin basted which wasn’t quite as fun as gluing.

The machine I had with me doesn’t have a rolled hem foot so I sewed a baby hem (using the method with three passes of the machine) and it came out great, maybe even better than a rolled hem.

The INTJ in me usually tries to outsmart the instructions.  In this case, my goal was to attach the bib with no exposed seam allowances.  The bib consists of two pieces of folded fabric with the folded edge overlapped along the center front.  Burda has you fold under the SA of the bib and topstitch it down which leaves you with an exposed seam allowance on the inside.  There’s no attachment method explained in Shirtmaking but from the photos it could be felled, which would be mighty tough with the curved seam.

img_0652
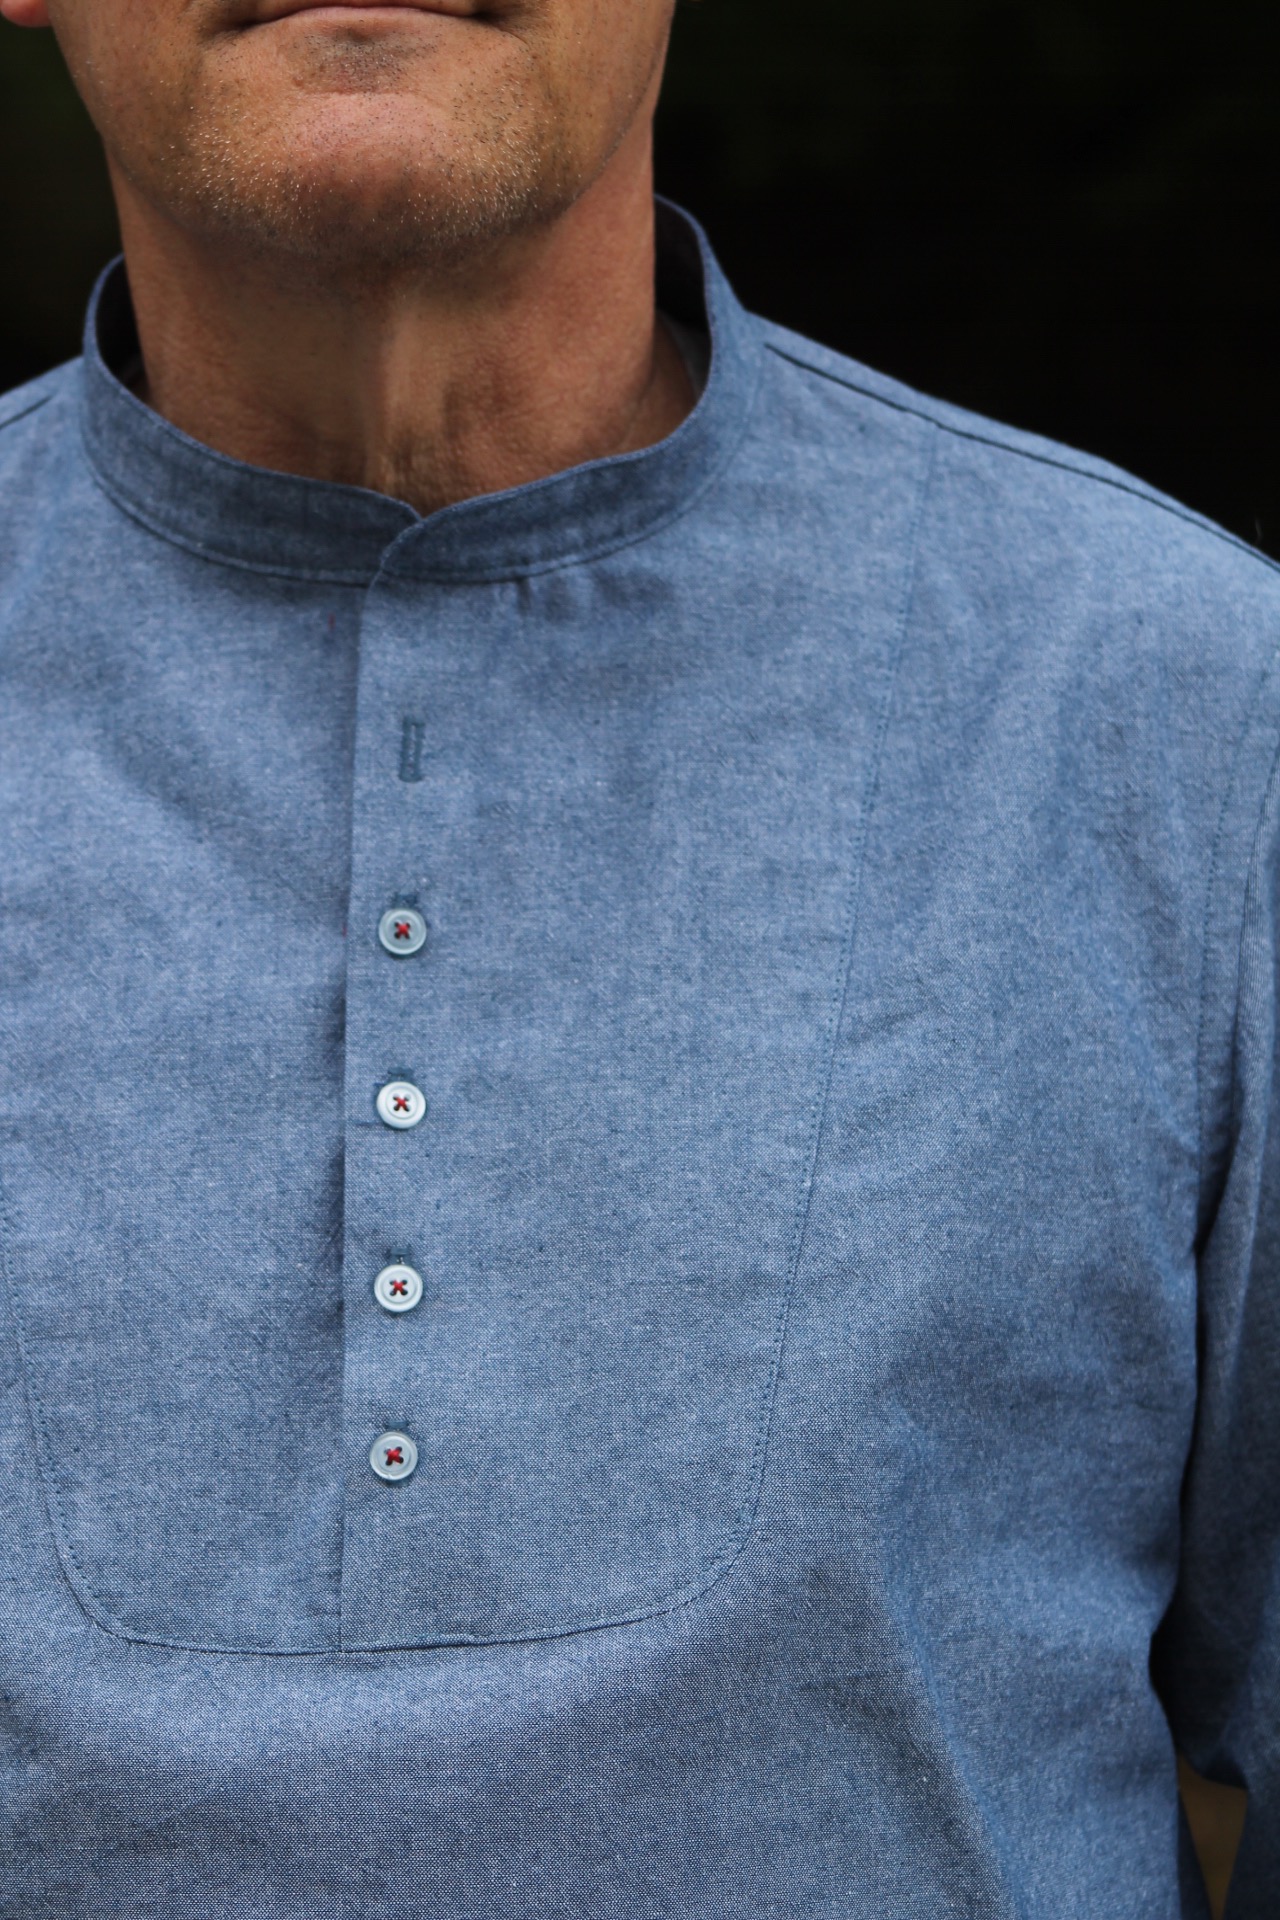
I couldn’t give a shirt to my Honey that had exposed seam allowance on the inside, could I?  Technically yes, but I was determined to figure out how to get a clean interior.  So how DO you attach the bib to the bodice without any exposed seam allowances?  I made two tiny clips at the bottom of the bib and used the Burrito method!  Everything is enclosed except for a ¼” slit on the back of the bib.  I attached a tiny patch (hack job) to the inside of the bib to prevent any fraying.  In hindsight this Burrito technique would work better with a separate bib facing instead of folding it.  Then you could skip the clip and patch.

Bib Detail

This was my first time using a ‘button foot’.  I used it for the buttons on the cuffs and it was pretty easy.  I could see how this would be a time saver if you had a lot of buttons.  (The buttons on the bib were sewn with red button and craft thread for a pop of color.)

img_0656LEASONS LEARNED/TIPS

  • Count your buttons and make sure you have enough thread when you sew away from home. I ran out of both when all I had left to do was put the buttonholes on the cuffs.
  • Man-sewing can be fun and satisfying!
  • Muslins can be made from old Marimekko sheets.
  • You could, possibly, baste your garment down to the ironing board cover if you don’t pay attention to what you are doing. Just speaking for a friend.

Red Scuba Dress

I am not much of a dress girl.   From the practical side they don’t play well with sweaters and jackets which are my staples for both winter and summer. Bare legs in the summer in the office are tough with the A/C so I typically wear pants to work.  In the winter I can wear skirts because I can wear them with tights and boots.

Mostly though dresses seem too feminine for me and put me outside my comfort zone.  I keep thinking that folks at work won’t take me seriously if I am too girly.  This latest wardrobe addition brings my dress count to a whopping 4 (two for special occasions and two for work all made by me)!  Maybe I need to channel Claire Underwood for some ‘serious’ dresses.

I made this dress for my brother’s wedding at the end of October, Halloween actually.  The invitation said “Wear your red dress” so of course I had to make one.  My inspiration was an image of Mary-Kate Olsen wearing a long narrow dress with a fur stole. I auditioned many patterns and ideas and finally arrived at the Kimono Wrap dress from Well-Suited.  It’s not a pattern per se but instructions and illustrations for drafting your own dress.

My attempt at the Kimono design was a hot mess and didn’t even make it to the muslin stage. I know, Kimono sleeves should be simple in theory.  Since I was under a time constraint for the wedding I tossed it aside for future cogitation.  I still liked the faux wrap detail so came up with something similar with set in sleeves using Armstrong’s Patterndrafting book.

Fabric

The fabric is a gorgeous red scuba knit that came from Gorgeous Fabrics.  It’s a medium weight scuba with a little more stretch in the width than length, and almost too thick for the gathered detail at the waist.  I fussed around with finding the right stretch lining for the bodice and in the end removed it.

Construction

The scuba fairly easy to work with, much easier than a jersey knit, and came together quickly.  The seams are serged with woolly nylon in the loopers, and the hem stitched with a twin needle.  The neckline just has a long straight stitch.

IMG_1558

Fit/Design

Not bad.  I think I’ve got a bit too much length in the back but that’s it.  For future reference I think the neckline is too wide and would be more flattering for my face shape if it was narrower.  At just below the knee the length is also out of my comfort zone.  I pegged it to keep it from being frumpy, but someday I may shorten to my favorite length just above the knee.

The Stole

What fun!  This is a faux fur that I got several years ago from Metro Textiles.  I was there a few weeks ago and he still has some…  I draped it for the shaping.  It’s just a tube so no wrap or fasteners.  I reused some silk from an old garment for the lining, but the BEST part is that it’s interlined with Polar Fleece!  So warm, comfy, chic, and perfect for an October wedding.

Lessons Learned

  • Don’t try to sew something fancy, special, etc on a deadline.  I should have learned this one by now….
  • Pattern Drafting is fun, especially when you are rotating darts and creating tucks and pleats.


Alabama Chanin Jacket and Skirt

img_0559
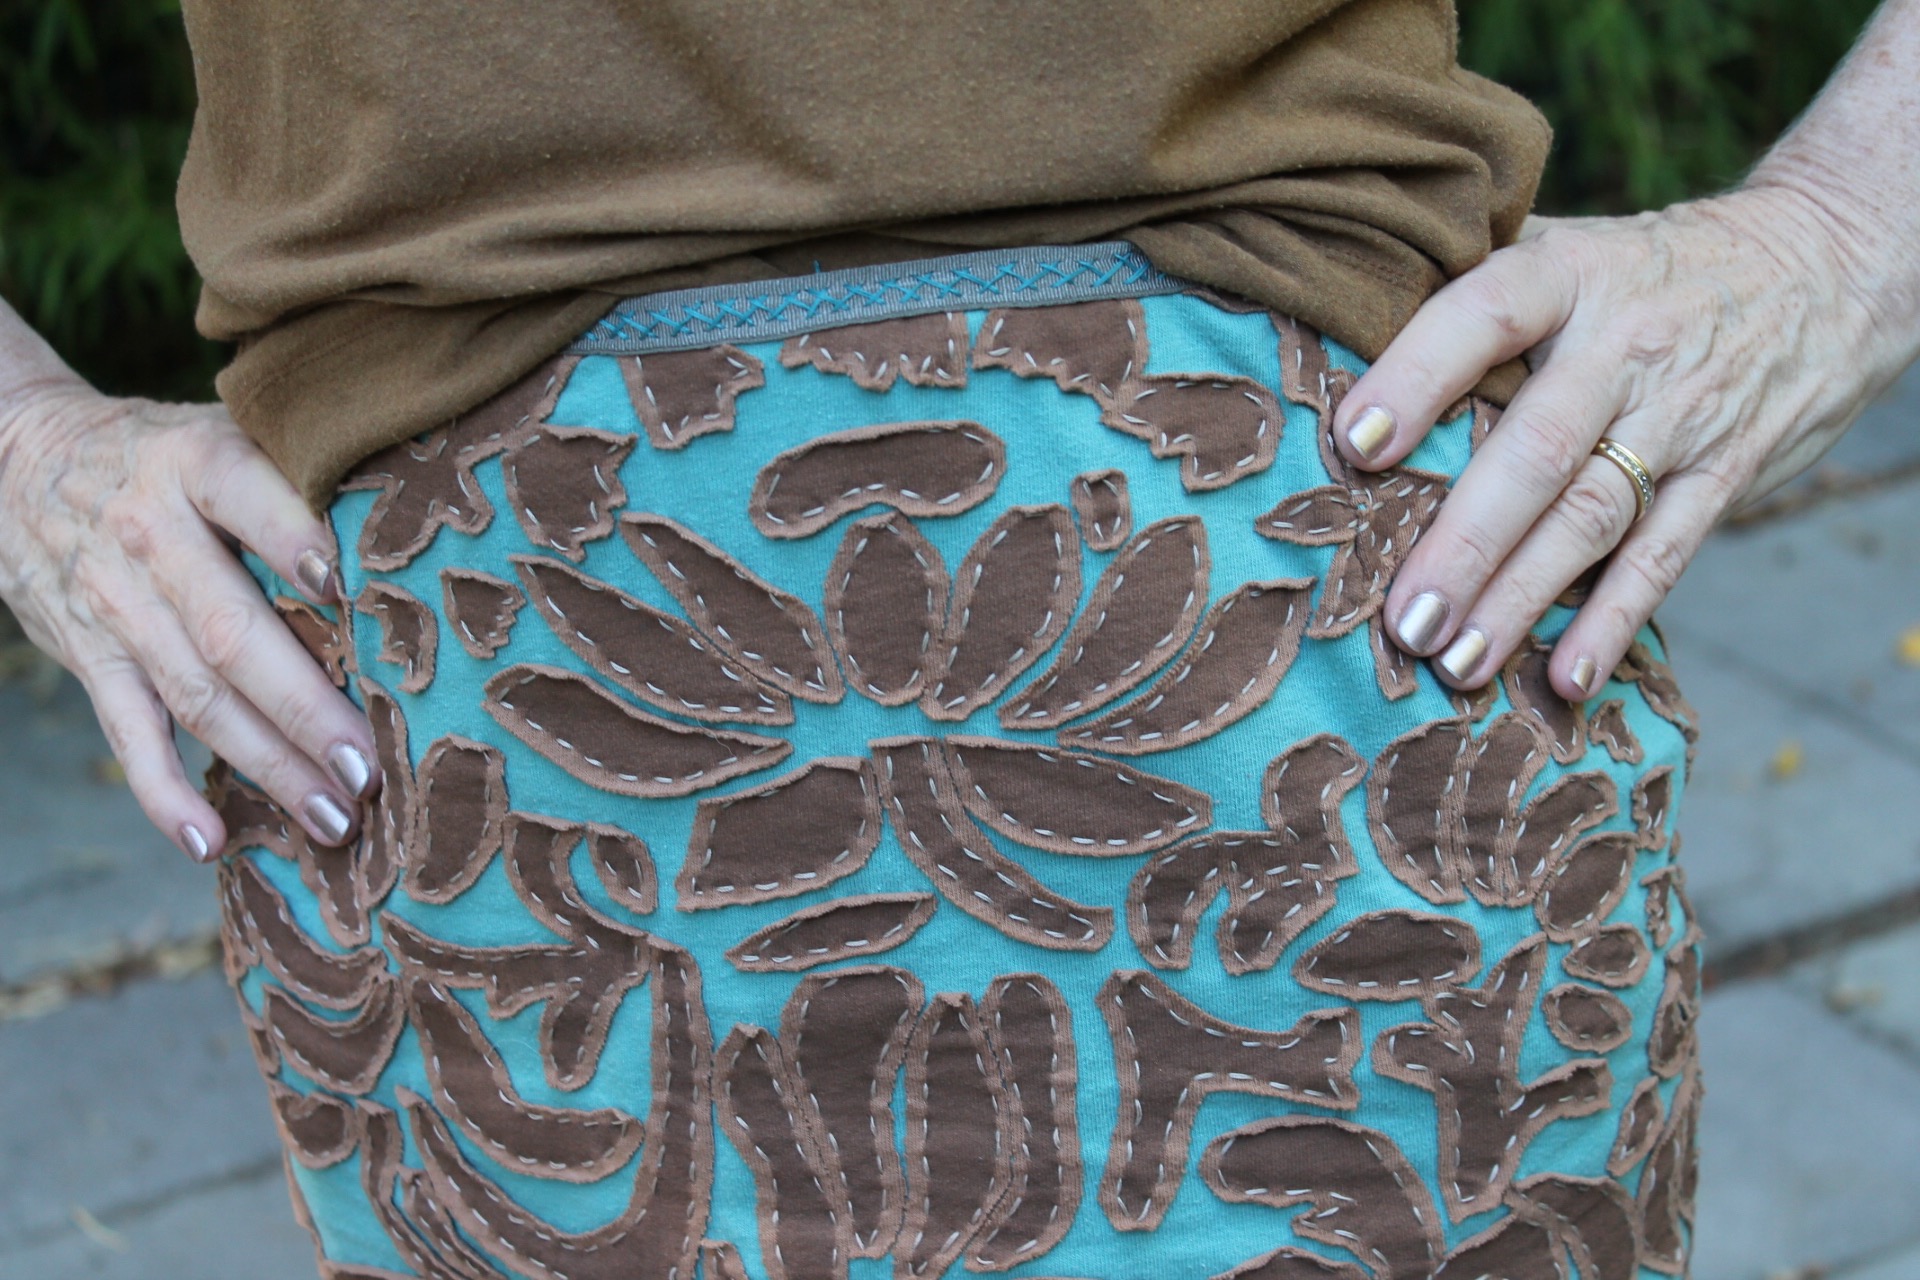
Yippee!  I’ve been working on this Alabama Chanin jacket and skirt since April.  They weren’t on my SWAP list but looked like a great challenge.  I was inspired by the prolific Ruth at Corecouture.  My plan was to stitch during my train commute instead of reading blogs and going down the Pinterest rabbit hole.  That part was a success but it crowded out my regular machine sewing as it’s quite addictive!  I sewed on the beach, at soccer games, at my mom’s, on the deck overlooking the lake….. It’s a whole new world once you’re not connected to the iron and sewing machine!

img_0599

For those of you not familiar with Alabama Chanin, it’s a high end 100% hand-stitched clothing line designed by Natalie Chanin and created by local seamstresses in Alabama.  The garments are all sewn from locally sourced organic cotton knit with various techniques such as appliqué, reverse appliqué, embroidery, beading, and sequins.  It often has raw edges and reminds me of folk art.  Natalie is happy to share her techniques with intrepid sewists and has written several books on her techniques complete with stencils and patterns.

THE PATTERN/SUPPLIES

Except for the peplum detail borrowed from a Marfy pattern, the jacket and skirt were both drafted from my slopers.  The fit is pretty good except that the front of the jacket doesn’t hang quite right.  It falls open at the waist and the bust feels bosomy which I am not.  I have several theories as to how to fix this but that will be another post.

The fabric and most of the thread (embroidery floss and ordinary button and craft thread) are from AC.  I also found some “hand quilting” thread at Joann’s which seems to be the exact same stuff as the button & craft thread except it comes in more colors.  The stencil pattern is Alabama Chanin’s Anna’s Garden.

img_0590

IT’S ALL ABOUT THE TECHNIQUE

This project had a lot of ‘firsts’ for me.  First hand sewn garments, first time stenciling, first appliqué, and first “embellishments” except for that denim skirt that I embroidered in high school.  I’ll try anything once.

I did a lot of experimentation with markers and paint colors and finally decided on Tulip spray paint.  The jacket is a teal paint on turquoise fabric overlaid on camel fabric.  This was originally supposed to be a reverse appliqué but after cutting out the shapes on several pieces I decided that I didn’t like the way the camel was working against the teal so I restitched about half the back.  The layers are connected using a backstitch with embroidery floss which takes forever.  Let’s say 6 to 8 hours per piece and I think there were 17 pieces.

Finally I added some sequins and beads around the front neckline.  I know, I’m a wild woman!  Oh and I almost forgot the snaps which have crocheted covers thanks to a tutorial on the Alabama Chanin blog.  I’m a newbie crocheter and this was amazingly tiny, done with thread like lace!  I just kept redoing it until I had three that looked similar.

The skirt is the opposite colorway with brown paint on camel fabric over a turquoise layer.  This was done with a running  stitch in a tan button thread which is much much faster.  It’s cut with a reverse appliqué and a raw hem that curls up ever so cutely.  The waistband is a foldover elastic sewn on with a stretch stitch.

THE MANY LESSONS LEARNED

  • Don’t spray paint outside, when it’s windy.
  • Have an excuse ready for when your husband finds a needle on the stairs.
  • Check the sofa throw for needles before sitting on it.
  • Use a the thickest mylar you can find.  Mine was too thin and would roll up when the paint was wet and stick to itself making quite a mess.
  • Needles travel well in a magnetic tray with a cover.
  • You will find tiny bits of fabric behind the car door handle, on the coffee table, in your tote, and in your bathrobe pocket.
  • Watch the thread tension on the backstitch.  I started with the back of the jacket which turned out a bit tighter than the front.
  • It pays to experiment.
  • This is not a race.  Savor the journey.

Cake – Camel and Gray Pants

I need pants. Long pants, short pants, wide pants, skinny pants, work pants….so I am officially checking two pair off my SWAP in camel and grey.  These are basic but will be workhorses in my wardrobe, hence the ‘cake’.  I’ll get to some icing soon.

PATTERN

Both pants were drafted using my sloper with modifications.  I borrowed the leg shape and width from a pair of RTW pants that I like.  They have an invisible zipper in the back to reduce any lumpiness in front and they have no pockets, again to maintain a clean look under my ubiquitous jackets and sweaters.  The only differences between the two pair is that the camel ones have a contoured waistband at the hip, and the gray ones have a 1″ straight waistband at the waist.  I also stitched down the crease in the front of the gray ones which I think makes a nice line.

I just need to get on my soapbox for a moment and give a shout out to SLOPERS!  Heh slopers, you ROCK!  It has taken me years to come up with bodice and pant slopers that finally fit.  For the longest time I thought that you were supposed to take a published pattern and then adjust it to match the fit of your sloper. No!  I learned from my sewing instructor  last year that I can use my sloper to add ease and style lines and I’m done!  This is a major sea change in the way I think about patterns.  I don’t have that many and now don’t really need that many.  Sure I’ll buy or download a pattern to copy a detail like a collar or peplum  but I don’t use the whole pattern.

Really, how many pants patterns do you need once you have a sloper.  There is no need to bang our collective heads against the wall every time we take a new pattern out of the envelope to fit it.

IMG_0461

FABRIC

These are both made from Rayon/Polyester/Lycra (RPL) which has a fabulous drape.  Emma  One Sock stocks it in a decent range of colors.  Although they are suppose to be the same fabric, the two colors are a bit different.  The camel is a bit “spongy”, thicker, and stretchier than the gray.   Stranger still is that the camel has the greatest stretch lengthwise which the grey does not so I cut the camel on the crossgrain.  They even fit a bit differently due to the slightly different stretch factor.  I’ve worn the camel three times so far and sadly it’s already starting to pill.   We’ll see how the grey fares as I’ve only worn them once.

The jury is still out on RPL.  I have some in cream which is in the middle of becoming pants, and I have several more yards of camel for a jacket and skirt but I’m not sure I’ll buy more.  I typically don’t buy polyester for environmental reasons but I was looking for something with a bit of Lycra and the price was right.  Real wool gaberdine is pricey and hard to find.

CONSTRUCTION

Besides jeans these are the only pants I haven’t lined.  Any lining would need to have the same stretchiness as the fashion fabric which was a tall order so I didn’t bother.  The edges were first serged then sewn together.  The waistbands were cut on the same grain as the rest of the pants.  The RPL doesn’t take too kindly to iron-on interfacing so I used two layers of horsehair interfacing stitched together and it worked out OK.

Camel Contoured Waistband: Interfacing was laid in after the waistband was sewn on.  Then the top and bottom seam allowances were catch-stitched around the interfacing to keep it in place.   I then sewed the side seams and handstitched a facing made from Bemberg lining.  The final step was topstitching the top and bottom of the waistband.  I went back in and took in the waist a bit more and made a royal mess of the topstitching and facing.  I need to find a better way to make a contoured waistband that still allows me to adjust the side seams without too much hassle.

Grey Straight Waistband:  This was much easer than the contoured band.  I used a technique I found in Pants for Real People where the interfacing is stitched to the seam allowance of the waistband before being attached to the pant.  Brilliant!  I’ve probably said it before but Pants for Real People and Jackets for Real People, both by Palmer/Pletsch are the best sewing books I have.  (Power Sewing by Sandra Betzina comes in third.)

Hems were topstitched in a rush.  I usually do a catch stitch to some interfacing but couldn’t use it on this fabric.  Note to self:  Try blind hemstitch next time.

FIT

Pretty darn close to perfect!  The only change I will make in the future is raising the back waistband up about a 1/2″.  These are about as narrow as I can get before I start to get the dreaded under-the-butt wrinkles.

LESSONS LEARNED:

  • Just because you have a swatch of a fabric in one color doesn’t mean that it will be the same in another color.  Always order a swatch if you can’t touch it in a store.
  • Maybe topstitch the waistband before sewing the side seams for ultimate adjustability?
  • Invisible zipper foot on my BabyLock is a PITA.  Use the one on my Viking which is a sure thing every time.


The Orange Shorts – Sewing Workshop Plaza Pant

This is the third time that I have made the Sewing Workshop Plaza Pants.  They are loose fitting and gathered at the waist except for a flat section in the front.  They should be made from fabric that has some drape.  They have a 1″ pleated seam down the front of each leg which is quite flattering.

The first time I made them I used some sort of cotton slinky with a ribbed texture if you can picture that.  They kept getting longer with each wear until the crotch was almost down to my knees.  I exaggerate, but they were a fail due to my fabric choice.  I did really like the pattern though so the next time I made a pair a pajama bottoms in plaid flannel.  They are super comfy and get so much use that they are threadbare and nearing the end of their life.

IMG_0245 copy
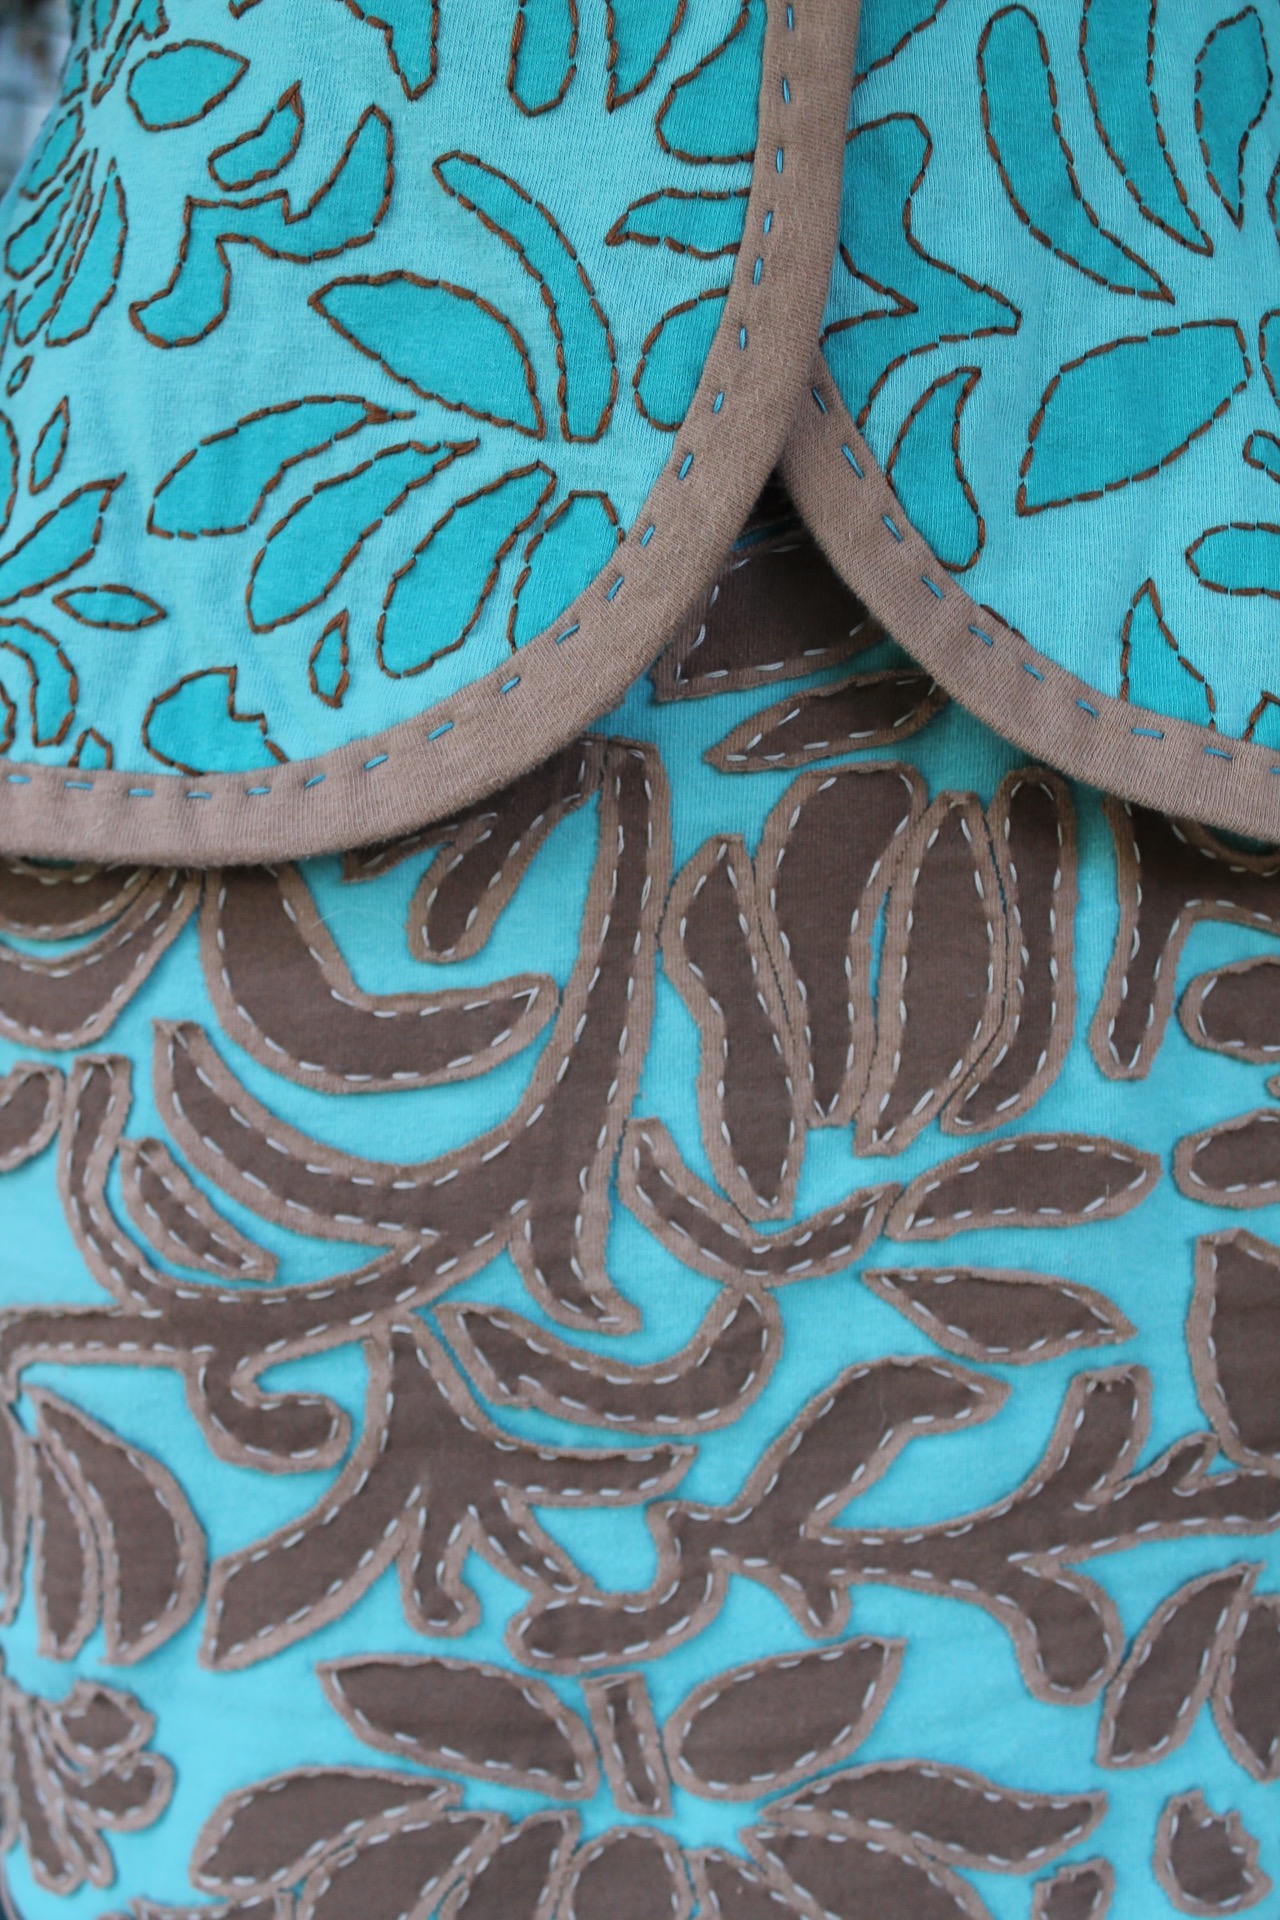
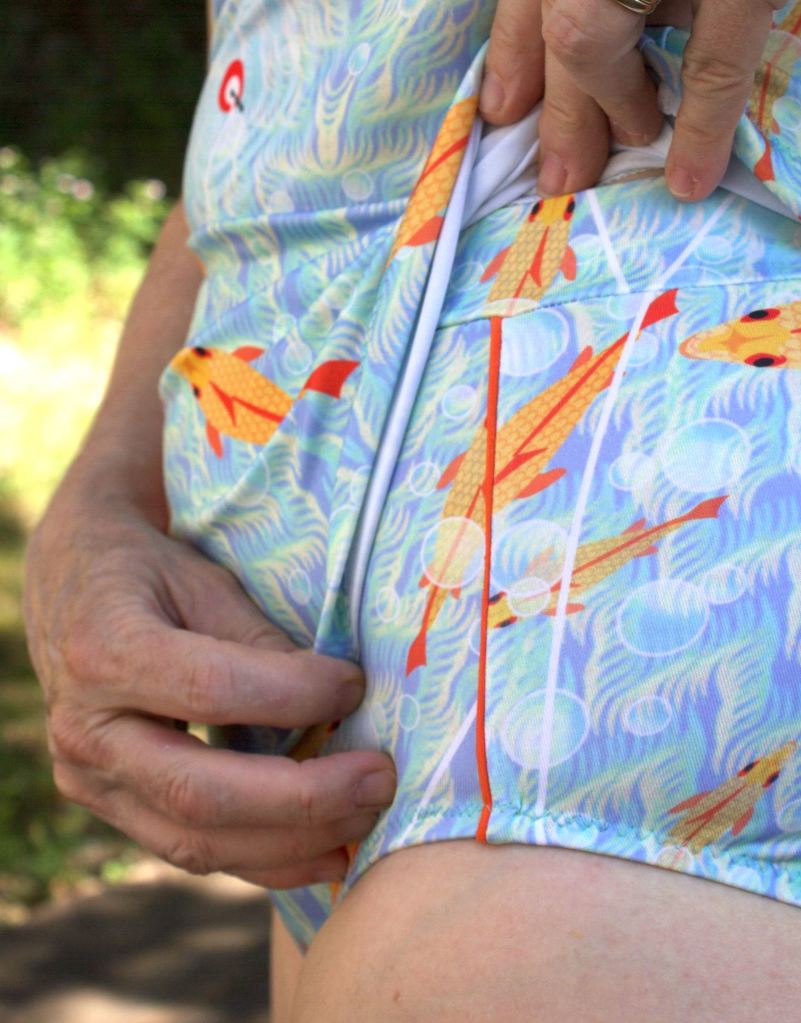
This latest iteration is a pair of shorts made for my St. Lucia wardrobe at the beginning of the year.  It’s some sort of technical fabric (New Balance maybe?) that I got from I’m guessing Fabric.com.  This knit is thick and drapey and most likely wicks sweat.  It also has a very soft finish that makes you want to pet it.  I love the color and have plenty more to make a running top and/or sporty zip jacket.
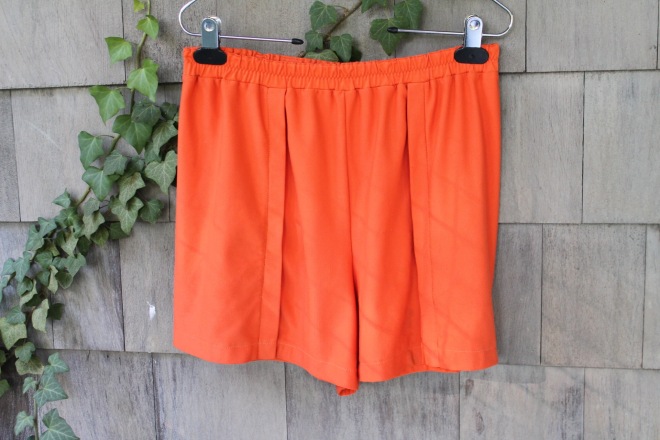
When tracing the shorts I replaced the crotch curve with my own and lowered the front waistline.

Even thought this is a simple pattern and has an adjustable waist I think a muslin is is a good idea. This is because there are no side seams to adjust, and due to the construction order the hem must be made before the front pleat.  Basically you need to get the fit right the first time.

IMG_0310

[So let’s talk about the elephant in the room.  What in the world are all those wrinkles in my lap that the camera picked up?  It’s a beefy knit for crying out loud!]

White Skinny Jeans – Burda 7863

Finally! A pair of pants completed, white pants, at the end of August.  I worked on my pants sloper on an off with my sewing instructor for about 6 months.  We got the sloper worked out for a standard pair of narrow (not skinny) pants.  The concept is that I can use the sloper to draft any other kind of pant but when dealing with a stretch fabric the whole pattern basically needed to be narrowed in the X direction inlcuding the pockets and crotch width.

I threw caution to the fashion winds and wore them to work today — way after Labor Day!  😛

White jeans are on my SWAP by the way so yeah me!

IMG_0398

PATTERN

I used Burda 7863  as the basis of design.  Basically I used the measurements of the pockets and back yoke.  The top of the jeans is about 1/4″ lower than my sloper.  For the next pair, and there will be several more, I won’t lower the back at all and will dip the front by another 1/2″.  The legs here are much narrower than the Burda pattern.

The pattern calls for a straight waistband but I made a contoured band instead with seams at the sides to allow for adjustments. It’s a bit bulky but I am always tweaking.

The one thing I messed up was the pocket placement on the rear.  It was fine until I started taking the sides in and now they are too far apart.  I’ve put the pants back in the sewing room for the winter  in the hope that I ‘ll get inpired to move them by spring.

IMG_0385

And yes, those are houndstooth Connies!

IMG_0392

FABRIC

I struggled a lot with the nature of the stretch denim which I am guessing has about 3% Lycra.  I think I got it at NY Elegant in NYC.  I prefer 2% Lycra but I had a hard enough time finding a white that was also thick enough to avoid show through.  The pretty floral waistband and zipper guard is actually the last of an old set of sheets.The pocket bags are just a buff colored quilting cotton purchased specifically for this project as I didn’t want anything to show through.

IMG_0313FIT

These are fresh out of a hot dryer for the photo shoot, but they loosen up in after an hour of wear.

I took them in at the waist, hip, and even reduced the crotch extension to accommodate the stretch properties.  I also narrowed the legs for style purposes.

The only fit issue that bothers me are the wrinkles below the derrière. My sewing instructor says that they need to be there if I actually want to SIT in my pants. Bummer!

IMG_0388

CONSTRUCTION

I’ve made jeans before so there was nothing new for these.  I always have difficulty at the ends of the waistband though where there is a lot of bulk.  Need to work on that. Jeans button and rivets are from Joann’s and were easy to intall.

The topstitching was done with white jeans thread which worked just fine.  I had my serger and two sewing machines running for this one so I didn’t have to keep changing the thread.

LEASONS LEARNED

  • Take fabric stretch into account when drafting the pockets.
  • Attach rear patch pockets AFTER fitting the waist and hip.